

Brioche
Brioche är ett utsökt, smörigt och mjukt bröd som är perfekt till frukost, brunch eller som tillbehör till en rejäl måltid. Den höga fetthalten i smöret som används i receptet ger brödet dess rika och flagnande textur. Den långa jäsningstiden och långsamma uppkomsten möjliggör också utvecklingen av en komplex och nyanserad smakprofil som inte kan uppnås med snabba brödrecept. Med sin vackra gyllenbruna skorpa och mjuka, fluffiga inre är Brioche ett måste för alla som älskar bakverk.
Ingredienser
- 1 paket (2½ tsk/7 g) aktiv torrjäst
- 2 msk ljummet vatten
- 250 g (2¼ bitar/9 oz) osaltat smör med hög fetthalt, rumstempererat, skuret i bitar (om ditt kök är mycket varmt, kompensera genom att använda kallt smör), plus mer för att smörja skålar och formar
- 500 g (3⅔ koppar) vetemjöl, plus mer för arbetsytor
- 55 g (¼ kopp) socker
- 7,5 g (1¼ tsk) fin
- havssalt
- 5 stora ägg, rumstempererade, knäckta i en medelstor skål, plus 1 ägg för pensling
Obs: YIELD ger två limpor på 9 x 5 tum. Receptet bör inte delas på mitten. Om du inte vill baka två limpor på en dag, frys in hälften av degen eller förvara den i kylskåp i två till tre dagar.
Du behöver tillräckligt med deg för att göra två limpor för detta recept.
Instruktioner
- Aktivera jästen. Vispa jästen med två matskedar ljummet (inte hett) vatten i en liten skål med en gaffel. Låt stå i cirka 2 minuter tills det bubblar. Ge jästblandningen en snabb vispning med gaffeln efter två minuter. Den är aktiverad om den är skummig. Om inte, börja om med en ny sats jäst och vatten som fortfarande är varmt.
- Smörj två stora glasbunkar ordentligt med en pensel eller en pappershandduk doppad i rumstempererat smör. Ställ åt sidan.
- Blanda mjöl, socker, salt och aktiverad jäst i skålen på en köksmaskin med paddelfäste. Täck den aktiverade jästblandningen med lite mjöl och placera den på ena sidan av skålen för att förhindra kontakt med saltet.
- Mixa på låg hastighet i cirka 30 sekunder tills alla ingredienser är väl blandade och konsistensen är jämn. Skrapa skålens kanter med en gummispatel.
- Tillsätt fem ägg och mixa på låg till medelhastighet tills degen går ihop och nästan alla ingredienser är inkorporerade (inte mer än tre till fyra minuter). När degen blir svår att blanda med köksmaskinen är det dags att tillsätta smöret.
- Fäst degkroken efter att paddelfästet tagits bort.
- Tillsätt smöret till degen i tre till fyra omgångar med mixern på låg hastighet, se till att smöret från föregående tillsats mestadels har försvunnit. Om nödvändigt, kombinera degen med en gummispatel. Undvik att överarbeta degen eftersom detta får smöret att separera och bli oljigt. Mixa på låg till medelhastighet i ytterligare 10 till 12 minuter, eller tills degen släpper från skålens kanter och är blank och slät. Degen ska ha viss motståndskraft vid beröring och inte fastna på händerna.
- Mjöla arbetsytan lätt. Använd en gummispatel eller degskrapa för att flytta degen till arbetsytan. Använd en degskrapa för att dela degen i två delar. Efter att ha mjölat händerna lätt, använd degskrapan för att försiktigt kasta degen runt arbetsytan och in i din fria hand för att forma två bolliknande former.
- Placera degen försiktigt i de smorda skålarna. Lägg en ren kökshandduk över varje skål och låt vila i rumstemperatur (20°C till 25°C) utan drag. Låt degen jäsa i två till två och en halv timme, men inte längre än så. Degen ska ha en slät yta och viss motståndskraft, och den ska vara gulaktig i färgen.
- Smörj två 9x5-tums brödformar ordentligt med en pensel eller en pappershandduk doppad i rumstempererat smör. Ställ åt sidan.
- Mjöla lätt dina händer och arbetsytan. Flytta försiktigt degen till den mjölade arbetsytan med händerna, en gummispatel eller en degskrapa.
- Forma en av degbollarna. Platta ut degen till en avlång form som är lika lång som brödformen, med den långa kanten mot dig, genom att arbeta dig horisontellt över degen med ena handen. Medan din andra hand plattar till med handflatan, håll försiktigt degen med din fria hand samtidigt som du behåller dess position.
- Ungefär 1/2 tum på vardera sidan, vik degens korta kanter in mot degens mitt så att de blir raka istället för rundade. Tryck lätt på skarvarna med fingrarna och för degen tillbaka till formens längd.
- Med tummarna pekande bakåt mot dig och pekfingrarna vid degens ytterkant, placera handflatorna platt på arbetsytan. Rulla degen i en cirkulär rörelse mot dig och forma den till en limpa genom att vika in kanterna med tummarna.
- Lyft försiktigt degklumpen och placera den med skarven nedåt i den förberedda formen, stöd den tyngre mitten. Den andra degbollen genomgår samma formningsprocedur.
- För att förhindra onödig rörelse som kan skada degen, täck båda formarna med en ren duk och placera dem på en dragfri plats, helst på din arbetsyta. Använd en plastpåse för att täcka formarna om ditt kök är dragigt. Låt limporna jäsa tills degen når formens topp eller precis ovanför, cirka 1½ till 2½ timmar. När du kontrollerar degen, försök att inte ta bort duken eftersom det skapar drag. Kontrollera istället om duken har höjt sig.
- Placera ett galler i den nedre tredjedelen av ugnen och förvärm ugnen till 350°F/180°C när degen nästan har jäst klart.
- Förbered äggtvätten. Vispa det återstående ägget i en liten skål. Pensla en mycket försiktig mängd äggtvätt över toppen på varje limpa med en bakpensel, var noga med att inte övermätta degen, vilket kan få limpan att sjunka ihop eller bränna toppen under gräddningen.
- Gör ett snitt i mitten av limpan med rena kökssaxar. Använd formens kant som stöd för saxen med din fria hand. Gör korta klipp längs brödets längd genom att föra handen horisontellt över limpan. För att degen ska kunna expandera runt snitten, täck den och låt den jäsa i 3 till 5 minuter på arbetsytan. Hoppa över detta steg och grädda limpan utan snitt om degen har jäst för mycket.
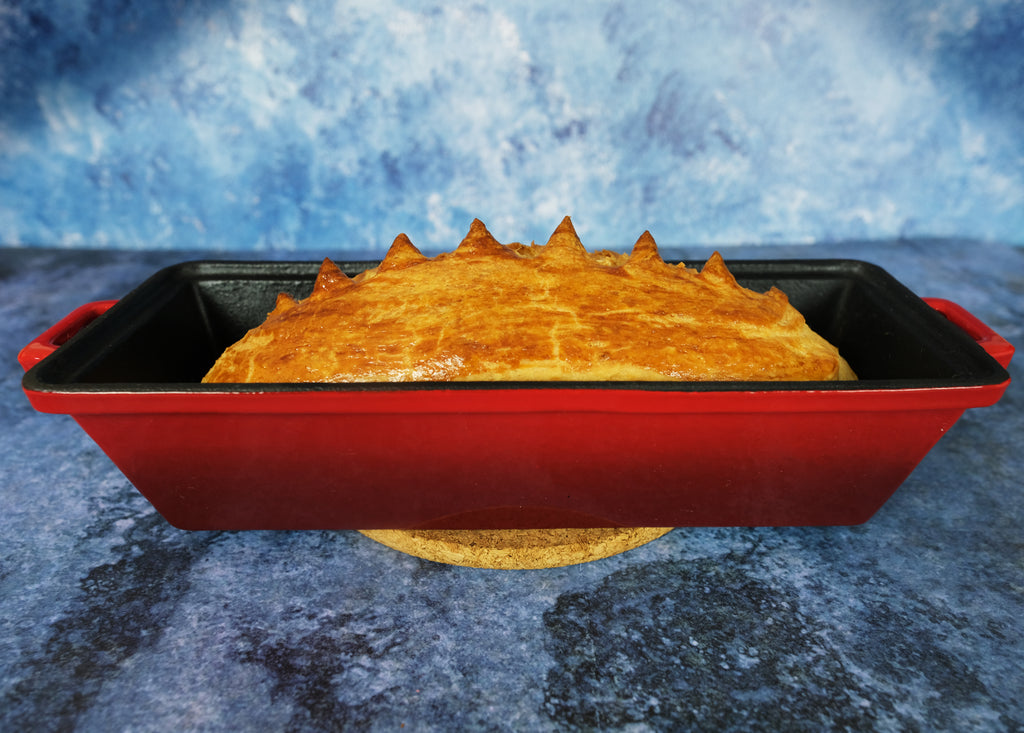
- Grädda limporna i 35 till 40 minuter, eller tills de är ljus terrakotta, gyllene eller orangefärgade. Undvik att öppna ugnsluckan under gräddningen eftersom det kan få brödet att sjunka ihop.
- Låt briochet vila i formen i ungefär två minuter tills ytan precis är tillräckligt sval för att vidröras. För att ta bort brödet från formen, vänd försiktigt över det med en hand. Limpa bör svalna i minst en timme på ett galler.
- Lägg brödet i en duk och placera det i en papperspåse där det kan förvaras i fem till sju dagar i rumstemperatur. Om du fryser, vänta tills brödet är helt avsvalnat. Det kan förvaras i en fryspåse i frysen i upp till tre månader. När du är redo att använda det, tina limpan i rumstemperatur.
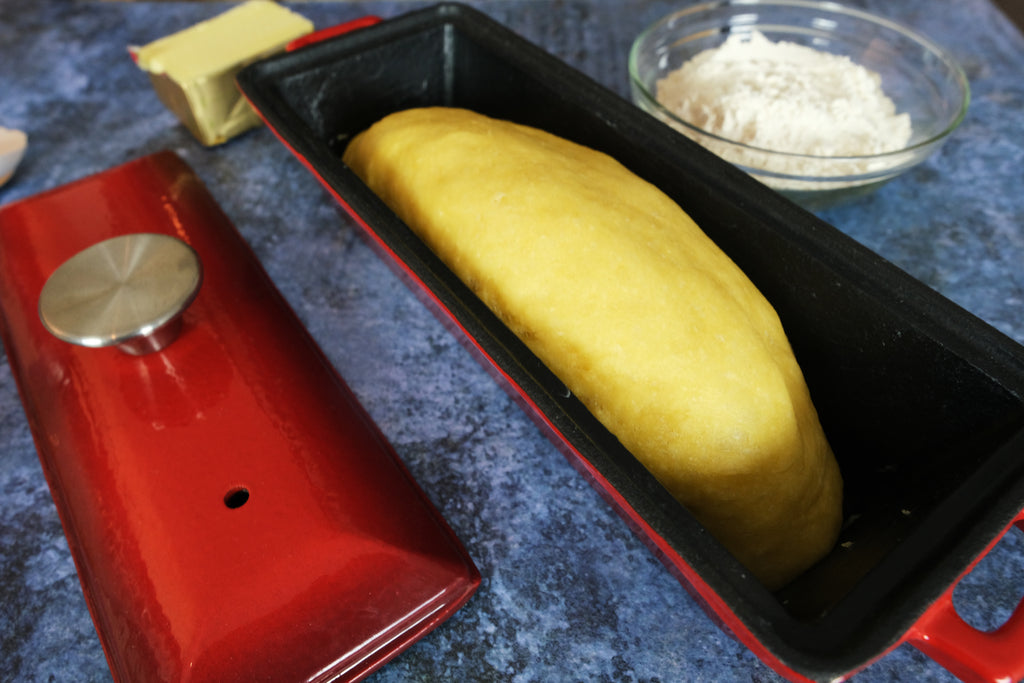


Den emaljerade gjutjärnsbrödformen i dessa bilder finns här.
SPARA ETT RECEPT TILL SENARE?
Om du vill spara detta recept till senare kan du skriva ut det, bokmärka sidan eller spara det på Pinterest.
Hur man skriver ut ett recept utan bilder
- Gå till https://www.printfriendly.com/
- Ange länken till receptet i inmatningsfältet och klicka på "Förhandsgranska"-knappen.
- I förhandsgranskningen, hovra över det element du inte vill skriva ut (bilder eller andra element) och klicka på papperskorgssymbolen för att ta bort det.
- När du är klar, klicka på utskriftsknappen.


Lämna en kommentar